
How to configure a custom domain for ArcGIS Experience Builder applications
One of the easiest ways to improve the professionalism and usability of your Managed ArcGIS Experience Builder applications is to give them a URL that belongs to your organisation.
Instead of sharing links such as:
https://app.cartinuum.com/container/ex/exb-5K1AKfE6Zr-7XnYO7C6/
you can provide users with a branded address such as:
https://experience.yourorganisation.com
or
https://gis.yourorganisation.com
or even
https://maps.yourorganisation.com
With custom domain support in Managed Experience Builder for ArcGIS, setting this up takes only a few minutes and requires just two DNS records.
Why use a custom domain?
Many organisations invest significant effort into creating professional GIS applications but then expose them through URLs that are difficult to remember, share, and trust.
A custom domain provides several benefits.
Improved user experience
Short, meaningful URLs are easier for users to remember and easier to distribute through emails, reports, and intranet pages.
Instead of sending users a complex URL containing identifiers and parameters, you can provide a simple address that clearly communicates its purpose.
Stronger branding
Your ArcGIS applications become part of your organisation's digital presence.
Whether you choose:
- maps.company.com
- gis.company.com
- planning.company.com
- experience.company.com
users immediately recognise that the application belongs to your organisation.
Increased trust
Users are naturally more comfortable accessing applications hosted under a familiar organisational domain.
This can be particularly important for public-facing applications where users may be hesitant to interact with unfamiliar URLs.
Cleaner communications
Custom domains look more professional in:
- Emails
- Reports
- Presentations
- Training materials
- QR codes
A simple URL is easier to communicate and more likely to be used correctly.
How custom domains work
Managed Experience Builder for ArcGIS handles all hosting, SSL certificate management, and routing behind the scenes.
To connect your own domain, you simply:
- Choose the subdomain you want to use.
- Create two DNS records.
- Wait for verification and activation.
- Start using your custom domain.
No web servers need to be configured.
No SSL certificates need to be purchased or installed.
No infrastructure expertise is required.
Step 1 – Enable custom domains
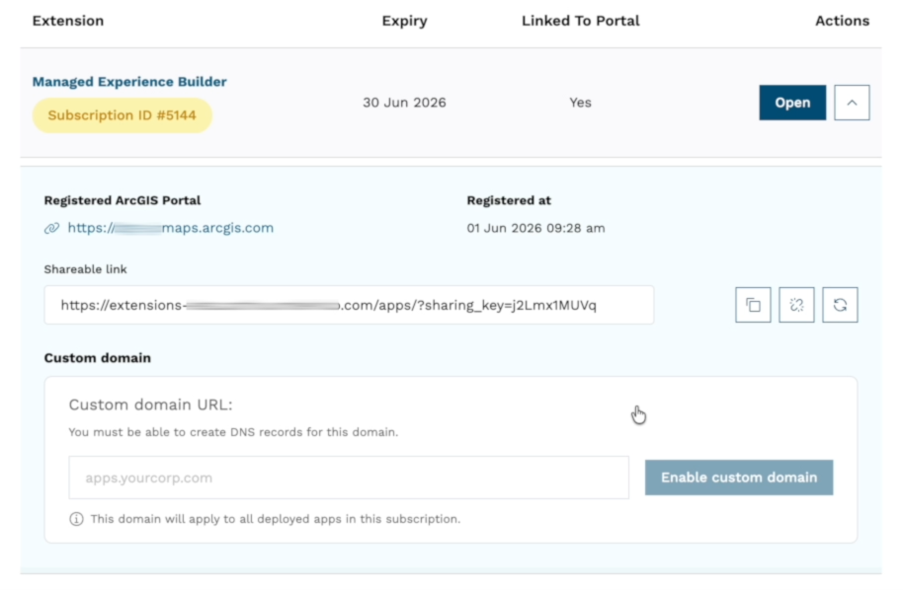
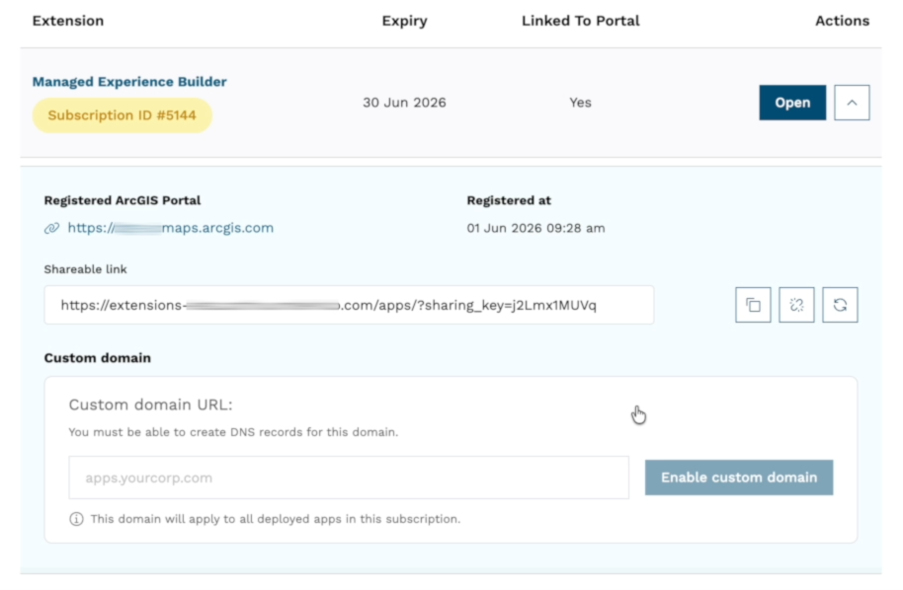
From the Managed Experience Builder for ArcGIS management console in Your Extensions, click the arrow to open the Custom Domain section.
Enter the subdomain you wish to use. For this example, we're using:
experience.cartinuum.app
Most organisations will typically use a subdomain of their own corporate domain.
Examples include:
- gis.yourorganisation.com
- maps.yourorganisation.com
- experience.yourorganisation.com
Step 2 – Review the DNS Records
Once the domain has been entered, the management console generates two DNS records.
The first record is used to verify ownership of the domain.
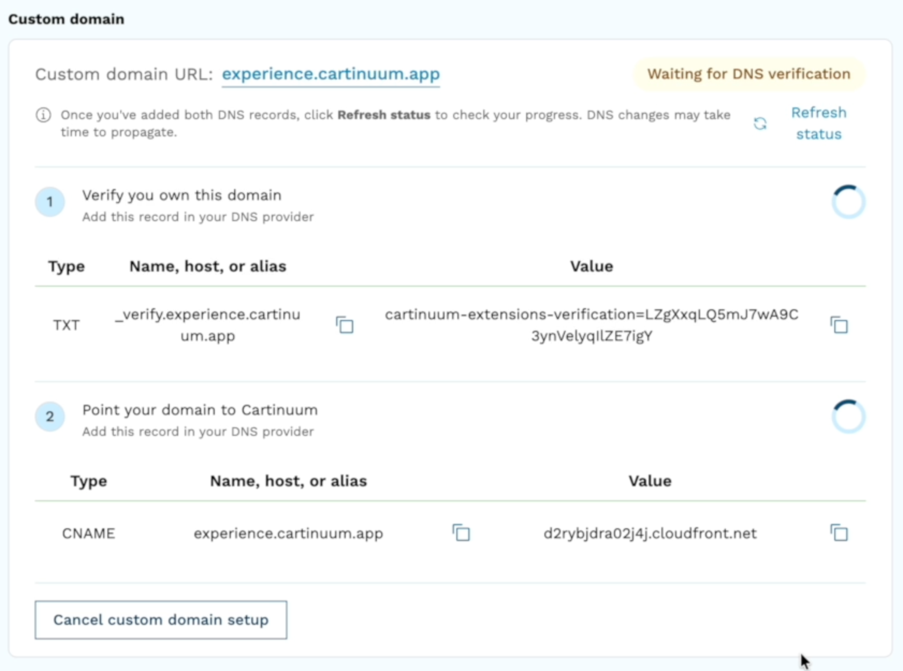
The second record directs traffic from your domain to the Managed Experience Builder platform.
Depending on the sub-domain you are using, you may need to get your IT department to configure the TXT and CNAME records for you.
Step 3 – Add the TXT verification record
Copy the TXT record from the management console and create it within your DNS provider.
This record confirms that you own the domain being configured.
Step 4 – Add the CNAME record
Next, copy the CNAME record from the management console.
Create this record within your DNS provider for the chosen subdomain.
This record directs requests from your domain to the Managed Experience Builder hosting environment.
Step 5 – Wait for verification
DNS changes take a few minutes to propagate across the internet.
Once the records become visible, the management console automatically detects them and begins the verification process.
Initially, the domain status will display: Waiting for DNS verification
Step 6 – Activation
After verification is complete, the platform automatically provisions and activates the domain.
During this phase, the status changes to: Activating your domain
This step can take 10 minutes to complete.
Step 7 – Start using your custom domain
Once activation is complete, the domain status changes to: Active
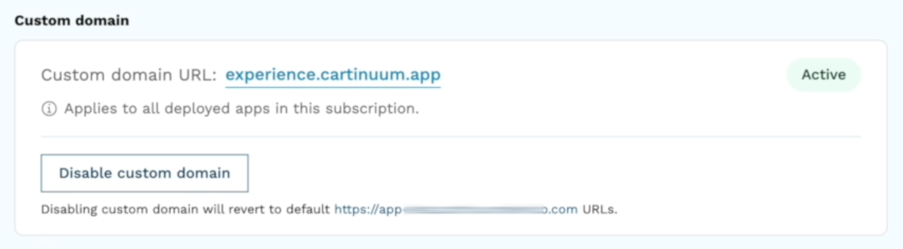
Your Experience Builder applications can now be accessed using your branded URL.
Instead of something like:
https://app.cartinuum.com/container/ex/exb-KfE6Zr-7XnYO7C6/0/index.html
users can simply visit:
https://experience.yourorganisation.com/0/index.html
or whichever domain you have chosen.
Managed Experience Builder for ArcGIS
Managed Experience Builder for ArcGIS allows ArcGIS Online organisations to build and run Experience Builder applications using custom widgets without maintaining their own Experience Builder Developer Edition environment.
Features include:
- Hosted Experience Builder environment
- Support for Cartinuum custom widgets
- Custom domains
- Managed upgrades
- SSL certificate management
- Simplified deployment
This allows organisations to focus on building GIS solutions rather than managing infrastructure.
Watch the video
The following video walks through the entire custom domain setup process from start to finish, including DNS configuration, verification, activation, and testing.
Ready to get started?
If you're already using Managed Experience Builder for ArcGIS, custom domains can usually be configured in just a few minutes.
For organisations looking to build professional ArcGIS Experience Builder applications with custom widgets and managed hosting, Managed Experience Builder provides a simple path to deployment without the complexity of maintaining your own development environment.

/Email%20Module%20Assets/linkedin.png)
/Email%20Module%20Assets/cartinuum_logo.png)
